Contributing to Bot
The purpose of this guide is to get you a running local version of the Python bot. This page will focus on the quickest steps one can take, with mentions of alternatives afterwards.
Clone The Repository
First things first, to run the bot's code and make changes to it, you need a local version of it (on your computer).
If you don't have Git on your computer already, install it. You can additionally install a Git GUI such as GitKraken, or the GitHub CLI.
To learn more about Git, you can look into our guides, as well as this cheatsheet, Learn Git Branching, and otherwise any guide you can find on the internet. Once you got the basic idea though, the best way to learn Git is to use it.
Creating a copy of a repository under your own account is called a fork. This is where all your changes and commits will be pushed to, and from where your pull requests will originate from.
You will need to create a fork of the project, and clone the fork. Once this is done, you will have completed the first step towards having a running version of the bot.
Working on the Repository Directly
If you are a member of the organisation (a member of this list, or in our particular case, server staff), you can clone the project repository without creating a fork, and work on a feature branch instead.
Set Up a Test Server
The Python bot is tightly coupled with the Python Discord server, so to have a functional version of the bot you need a server with channels it can use. It's possible to set the bot to use a single channel for all cogs, but that will cause extreme spam and will be difficult to work with.
You can start your own server and set up channels as you see fit, but for your convenience we have a template for a development server you can use: https://discord.new/zmHtscpYN9E3. Keep in mind that this is not a mirror of the Python server, but a reduced version for testing purposes. A lot of the channels in the Python server were merged.
Set Up a Bot Account
You will need your own bot account on Discord to test your changes to the bot. See here for help with setting up a bot account. Once you have a bot account, invite it to the test server you created in the previous section.
Privileged Intents
It is necessary to explicitly request that your Discord bot receives certain gateway events.
The Python bot requires the Server Member Intent to function.
In order to enable it, visit the Developer Portal (from where you copied your bot's login token) and scroll down to the Privileged Gateway Intents section.
The Presence Intent is not necessary and can be left disabled.
If your bot fails to start with a PrivilegedIntentsRequired exception, this indicates that the required intent was not enabled.
Configure the Bot
You now have both the bot's code and a server to run it on. It's time you to connect the two by changing the bot's configurations.
config.yml
Entering the directory of the cloned code, you will find a file named config-default.yml.
This file contains the various configurations we use to make the bot run on the Python Discord server, such as channel and role IDs, and the emojis it works with.
It also contains configurations such as how long it takes for a help channel to time out, and how many messages a user needs to voice-verify.
To run the bot in your test server, you will need to override some of those configurations.
Create and open a new file in the directory called config.yml. Alternatively, copy the config-default.yml file and rename the copy to config.yml.
The bot will first look at the items in config.yml, and will fall back to config-default.yml only if necessary. Note that you don't have to specify all items in config.yml, just the ones you want to override such as channel IDs.
See here for help with obtaining Discord IDs.
If you used the provided server template, and you're not sure which channels belong where in the config file, you can use the config below. Pay attention to the comments with several # symbols, and replace the � characters with the right IDs.
bot:
    prefix:      "!"

    redis:
        host:  "redis"
        password: null
        port:  6379
        use_fakeredis: true

    stats:
        presence_update_timeout: 300
        statsd_host: "graphite.default.svc.cluster.local"

urls:
    # PyDis site vars
    site:        &DOMAIN       "web:8000"
    site_api:    &API    !JOIN [*DOMAIN, "/api"]
    site_api_schema:           "http://"
    site_paste:  &PASTE  !JOIN ["paste.", "pythondiscord.com"]
    site_schema: &SCHEMA       "http://"
    site_staff:  &STAFF  !JOIN [*DOMAIN, "/staff"]

    paste_service:                      !JOIN ["https://", *PASTE, "/{key}"]
    site_logs_view:                     !JOIN [*SCHEMA, *STAFF, "/bot/logs"]

    # Snekbox
    snekbox_eval_api: "http://localhost:8060/eval"

##### <<  Replace the following � characters with the channel IDs in your test server  >> #####
#  This assumes the template was used: https://discord.new/zmHtscpYN9E3
dev_guild:
    id: &DEV_GUILD_ID   �

    categories:
        logs:           &DEV_LOGS               �
        help_available: &DEV_HELP_AVAILABLE     �
        help_occupied:  &DEV_HELP_OCCUPIED      �
        help_dormant:   &DEV_HELP_DORMANT       �
        voice:          &DEV_VOICE              �

    channels:
        # Staff
        admins_mods:            &DEV_ADMINS_MODS            �
        lounge_helpers_org:     &DEV_LOUNGE_HELPERS_ORG     �
        defcon:                 &DEV_DEFCON                 �
        incidents:              &DEV_INCIDENTS              �
        incidents_archive:      &DEV_INCIDENTS_ARCHIVE      �
        staff_announcements:    &DEV_STAFF_ANNOUNCEMENTS    �
        dev_logs:               &DEV_DEV_LOGS               �

        # Logs
        all_logs:   &DEV_ALL_LOGS   �
        bb_logs:    &DEV_BB_LOGS    �
        duck_pond:  &DEV_DUCK_POND  �

        # Available Help Channels
        how_to_get_help:    &DEV_HTGH   �

        # Miscellaneous
        bot_commands:       &DEV_BOT_CMD    �
        general_meta_voice: &DEV_GMV        �
        dev_core_contrib:   &DEV_DEV        �

        # Voice
        voice-verification: &DEV_VOICE_VER      �
        vc:                 &DEV_VC             �
        staff_voice:        &DEV_STAFF_VOICE    �

        # News
        announcements:  &DEV_ANNOUNCEMENTS  �
        py_news:        &DEV_PY_NEWS        �

        # Off-topic
        off_topic_0: &DEV_OT_0  �
        off_topic_1: &DEV_OT_1  �
        off_topic_2: &DEV_OT_2  �

guild:
    ##### <<  Replace the following � characters with the role and webhook IDs in your test server  >> #####
    roles:
        announcements:                          �
        contributors:                           �
        help_cooldown:                          �
        muted:              &MUTED_ROLE         �
        partners:           &PY_PARTNER_ROLE    �
        python_community:   &PY_COMMUNITY_ROLE  �
        voice_verified:                         �

        # Staff
        admins:             &ADMINS_ROLE    �
        core_developers:                    �
        devops:                             �
        domain_leads:                       �
        helpers:            &HELPERS_ROLE   �
        moderators:         &MODS_ROLE      �
        mod_team:           &MOD_TEAM_ROLE  �
        owners:             &OWNERS_ROLE    �
        code_jam_event_team:                �
        project_leads:                      �

        # Code Jam
        team_leaders:   �

        # Streaming
        video: �

    webhooks:
        big_brother:                            �
        dev_log:                                �
        duck_pond:                              �
        incidents_archive:                      �
        python_news:        &PYNEWS_WEBHOOK     �
        talent_pool:                            �

    ##### <<  At this point your test bot should be able to mostly work with your test server  >> #####
    #  The following is the actual configs the bot uses, don't delete these.
    id: *DEV_GUILD_ID
    invite: "https://discord.gg/python"

    categories:
        help_available:                     *DEV_HELP_AVAILABLE
        help_dormant:                       *DEV_HELP_DORMANT
        help_in_use:                        *DEV_HELP_OCCUPIED
        logs:                               *DEV_LOGS
        voice:                              *DEV_VOICE

    channels:
        # Public announcement and news channels
        announcements:  *DEV_ANNOUNCEMENTS
        change_log:     *DEV_ANNOUNCEMENTS
        mailing_lists:  *DEV_ANNOUNCEMENTS
        python_events:  *DEV_ANNOUNCEMENTS
        python_news:    *DEV_PY_NEWS

        # Development
        dev_contrib:        *DEV_DEV
        dev_core:           *DEV_DEV
        dev_log:            *DEV_DEV_LOGS

        # Discussion
        meta:                               *DEV_GMV
        python_general:     *DEV_GMV

        # Python Help: Available
        cooldown:           *DEV_HTGH
        how_to_get_help:    *DEV_HTGH

        # Topical
        discord_py:         *DEV_GMV

        # Logs
        attachment_log:     *DEV_ALL_LOGS
        message_log:        *DEV_ALL_LOGS
        mod_log:            *DEV_ALL_LOGS
        user_log:           *DEV_ALL_LOGS
        voice_log:          *DEV_ALL_LOGS

        # Off-topic
        off_topic_0:    *DEV_OT_0
        off_topic_1:    *DEV_OT_1
        off_topic_2:    *DEV_OT_2

        # Special
        bot_commands:       *DEV_BOT_CMD
        voice_gate:         *DEV_VOICE_VER
        code_jam_planning:  *DEV_ADMINS_MODS

        # Staff
        admins:             *DEV_ADMINS_MODS
        admin_spam:         *DEV_ADMINS_MODS
        defcon:             *DEV_DEFCON
        duck_pond:          *DEV_DUCK_POND
        helpers:            *DEV_LOUNGE_HELPERS_ORG
        incidents:                          *DEV_INCIDENTS
        incidents_archive:                  *DEV_INCIDENTS_ARCHIVE
        mods:               *DEV_ADMINS_MODS
        mod_alerts:                         *DEV_ADMINS_MODS
        mod_meta:           *DEV_ADMINS_MODS
        mod_spam:           *DEV_ADMINS_MODS
        mod_tools:          *DEV_ADMINS_MODS
        organisation:       *DEV_LOUNGE_HELPERS_ORG
        staff_lounge:       *DEV_LOUNGE_HELPERS_ORG

        # Staff announcement channels
        admin_announcements:    *DEV_STAFF_ANNOUNCEMENTS
        mod_announcements:      *DEV_STAFF_ANNOUNCEMENTS
        staff_announcements:    *DEV_STAFF_ANNOUNCEMENTS

        # Voice Channels
        admins_voice:       *DEV_STAFF_VOICE
        code_help_voice_1:  *DEV_VC
        code_help_voice_2:  *DEV_VC
        general_voice:      *DEV_VC
        staff_voice:        *DEV_STAFF_VOICE

        # Voice Chat
        code_help_chat_1:                   *DEV_GMV
        code_help_chat_2:                   *DEV_GMV
        staff_voice_chat:                   *DEV_ADMINS_MODS
        voice_chat:                         *DEV_GMV

        # Watch
        big_brother_logs:                   *DEV_BB_LOGS

    moderation_categories:
        - *DEV_LOGS

    moderation_channels:
        - *DEV_ADMINS_MODS

    # Modlog cog ignores events which occur in these channels
    modlog_blacklist:
        - *DEV_ADMINS_MODS
        - *DEV_ALL_LOGS
        - *DEV_STAFF_VOICE

    reminder_whitelist:
        - *DEV_BOT_CMD
        - *DEV_DEV

    moderation_roles:
        - *ADMINS_ROLE
        - *MODS_ROLE
        - *MOD_TEAM_ROLE
        - *OWNERS_ROLE

    staff_roles:
        - *ADMINS_ROLE
        - *HELPERS_ROLE
        - *MODS_ROLE
        - *OWNERS_ROLE

##### <<  The bot shouldn't fail without these, but commands adding specific emojis won't work.  >> #####
#  You should at least set the trashcan. Set the incidents emojis if relevant.
style:
    emojis:
        badge_bug_hunter: "<:bug_hunter_lvl1:�>"
        badge_bug_hunter_level_2: "<:bug_hunter_lvl2:�>"
        badge_early_supporter: "<:early_supporter:�>"
        badge_hypesquad: "<:hypesquad_events:�>"
        badge_hypesquad_balance: "<:hypesquad_balance:�>"
        badge_hypesquad_bravery: "<:hypesquad_bravery:�>"
        badge_hypesquad_brilliance: "<:hypesquad_brilliance:�>"
        badge_partner: "<:partner:�>"
        badge_staff: "<:discord_staff:�>"
        badge_verified_bot_developer: "<:verified_bot_dev:�>"

        defcon_shutdown:    "<:defcondisabled:�>"
        defcon_unshutdown:  "<:defconenabled:�>"
        defcon_update:      "<:defconsettingsupdated:�>"

        failmail: "<:failmail:�>"

        #incident_actioned:      "<:incident_actioned:�>"
        incident_investigating: "<:incident_investigating:�>"
        incident_unactioned:    "<:incident_unactioned:�>"

        status_dnd:     "<:status_dnd:�>"
        status_idle:    "<:status_idle:�>"
        status_offline: "<:status_offline:�>"
        status_online:  "<:status_online:�>"

        trashcan: "<:trashcan:�>"

##### <<  Optional - If you don't care about the filtering and help channel cogs, ignore the rest of this file  >> #####
filter:
    # What do we filter?
    filter_domains:        true
    filter_everyone_ping:  true
    filter_invites:        true
    filter_zalgo:          false
    watch_regex:           true
    watch_rich_embeds:     true

    # Notify user on filter?
    # Notifications are not expected for "watchlist" type filters
    notify_user_domains:        false
    notify_user_everyone_ping:  true
    notify_user_invites:        true
    notify_user_zalgo:          false

    # Filter configuration
    offensive_msg_delete_days: 7     # How many days before deleting an offensive message?
    ping_everyone:             true

    # Censor doesn't apply to these
    channel_whitelist:
        - *DEV_ADMINS_MODS
        - *DEV_BB_LOGS
        - *DEV_ALL_LOGS
        - *DEV_LOUNGE_HELPERS_ORG

    role_whitelist:
        - *ADMINS_ROLE
        - *HELPERS_ROLE
        - *MODS_ROLE
        - *OWNERS_ROLE
        - *PY_COMMUNITY_ROLE
        - *PY_PARTNER_ROLE

help_channels:
    enable: true

    # Minimum interval before allowing a certain user to claim a new help channel
    claim_minutes: 1

    # Roles which are allowed to use the command which makes channels dormant
    cmd_whitelist:
        - *HELPERS_ROLE

    # Allowed duration of inactivity before making a channel dormant
    idle_minutes: 1

    # Allowed duration of inactivity when channel is empty (due to deleted messages)
    # before message making a channel dormant
    deleted_idle_minutes: 1

    # Maximum number of channels to put in the available category
    max_available: 2

    # Maximum number of channels across all 3 categories
    # Note Discord has a hard limit of 50 channels per category, so this shouldn't be > 50
    max_total_channels: 20

    # Prefix for help channel names
    name_prefix: 'help-'

    # Notify if more available channels are needed but there are no more dormant ones
    notify: true

    # Channel in which to send notifications
    notify_channel: *DEV_LOUNGE_HELPERS_ORG

    # Minimum interval between helper notifications
    notify_minutes: 5

    # Mention these roles in notifications
    notify_roles:
        - *HELPERS_ROLE

##### <<  Add any additional sections you need to override from config-default.yml  >> #####
If you don't wish to use the provided config.yml above, these are the main sections in config-default.yml that need overriding:
guild.idguild.categoriesguild.channelsguild.rolesguild.webhooksstyle.emojis
Additionally:
- At this stage, set
bot.redis.use_fakeredistotrue. If you're looking for instructions for working with Redis, see Working with Redis. - Set
urls.site_apito!JOIN [*DOMAIN, "/api"]. - Set
urls.site_schemaandurls.site_api_schemato"http://".
We understand this is tedious and are working on a better solution for setting up test servers.
config-default.yml to match your server, it is heavily discouraged.
This file's purpose is to provide the configurations the Python bot needs to run in the Python server in production, and should remain as such.
In contrast, the config.yml file can remain in your local copy of the code, and will be ignored by commits via the project's .gitignore.
.env
The second file you need to create is the one containing the environment variables, and needs to be named .env.
Inside, add the line BOT_TOKEN=YourDiscordBotTokenHere. See here for help with obtaining the bot token.
The .env file will be ignored by commits.
Run it!
With Docker
You are now almost ready to run the Python bot. The simplest way to do so is with Docker.
- Docker CE
- Docker Compose. If you're using macOS and Windows, this already comes bundled with the previous installation. Otherwise, you can download it either from the website, or by running
pip install docker-compose.
If you get any Docker related errors, reference the Possible Issue section of the Docker page.
In your config.yml file:
- Set
urls.siteto"web:8000". - If you wish to work with snekbox set
urls.snekbox_eval_apito"http://snekbox:8060/eval".
Assuming you have Docker installed and running, enter the cloned repo in the command line and type docker-compose up.
After pulling the images and building the containers, your bot will start. Enter your server and type !help (or whatever prefix you chose instead of !).
Your bot is now running, but this method makes debugging with an IDE a fairly involved process. For additional running methods, continue reading the following sections.
With the Bot Running Locally
The advantage of this method is that you can run the bot's code in your preferred editor, with debugger and all, while keeping all the setup of the bot's various dependencies inside Docker.
- Append the following line to your
.envfile:BOT_API_KEY=badbot13m0n8f570f942013fc818f234916ca531. - In your
config.ymlfile, seturls.siteto"localhost:8000". If you wish to keep usingweb:8000, then COMPOSE_PROJECT_NAME has to be set. - To work with snekbox, set
urls.snekbox_eval_apito"http://localhost:8060/eval"
You will need to start the services separately, but if you got the previous section with Docker working, that's pretty simple:
docker-compose up webto start the site container. This is required.docker-compose up snekboxto start the snekbox container. You only need this if you're planning on working on the snekbox cog.docker-compose up redisto start the Redis container. You only need this if you're not using fakeredis. For more info refer to Working with Redis.
You can start several services together: docker-compose up web snekbox redis.
Setting Up a Development Environment
The bot's code is Python code like any other. To run it locally, you will need the right version of Python with the necessary packages installed:
- Make sure you have Python 3.9 installed. It helps if it is your system's default Python version.
- Install Poetry.
- Install the dependencies.
With at least the site running in Docker already (see the previous section on how to start services separately), you can now start the bot locally through the command line, or through your preferred IDE.
- Through the command line, inside the bot directory, with either
poetry run task start, or directlypython -m bot. - If using PyCharm, enter
Edit Configurationsand set everything according to this image: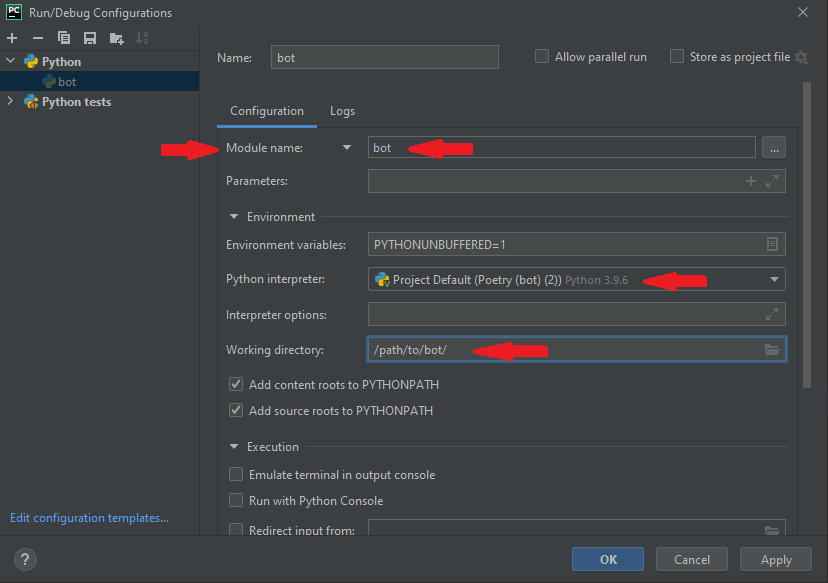
- If using Visual Studio Code, set the interpreter to the poetry environment you created. In
launch.jsoncreate a new Python configuration, and set the name of the program to be run tobot. VSC will correctly run it as a module.
With More Things Running Locally
You can run additional services on the host, but this guide won't go over how to install and start them in this way. If possible, prefer to start the services through Docker to replicate the production environment as much as possible.
The site, however, is a mandatory service for the bot.
Refer to the previous section and the site contributing guide to learn how to start it on the host, in which case you will need to change urls.site in config.yml to wherever the site is being hosted.
Development Tips
Now that you have everything setup, it is finally time to make changes to the bot!
Working with Git
If you have not yet read the contributing guidelines, now is a good time. Contributions that do not adhere to the guidelines may be rejected.
Notably, version control of our projects is done using Git and Github. It can be intimidating at first, so feel free to ask for any help in the server.
Click here to see the basic Git workflow when contributing to one of our projects.
Running tests
This section of the README in the tests repository will explain how to run tests.
The whole document explains how unittesting works, and how it fits in the context of our project.
Make sure to run tests before pushing code.
Even if you run the bot through Docker, you might want to setup a development environment in order to run the tests locally.
Lint before you push
As mentioned in the contributing guidelines, you should make sure your code passes linting for each commit you make.
For ease of development, you can install the pre-commit hook with poetry run task precommit, which will check your code every time you try to commit it.
For that purpose, even if you run the bot through Docker, you might want to setup a development environment, as otherwise the hook installation will fail.
Reloading parts of the bot
If you make changes to an extension, you might not need to restart the entire bot for the changes to take effect. The command !ext reload <extension_name> re-imports the files associated with the extension.
Invoke !ext list for a full list of the available extensions. In this bot in particular, cogs are defined inside extensions.
Note that if you changed code that is not associated with a particular extension, such as utilities, converters, and constants, you will need to restart the bot.
Adding new statistics
Details on how to add new statistics can be found on the statistic infrastructure page. We are always open to more statistics so add as many as you can!
Optional: Working with Redis
In Configure the Bot you were asked to set bot.redis.use_fakeredis to true. If you do not need to work on features that rely on Redis, this is enough. Fakeredis will give the illusion that features relying on Redis are saving information properly, but restarting the bot or the specific cog will wipe that information.
If you are working on a feature that relies on Redis, you will need to enable Redis to make sure persistency is achieved for the feature across restarts. The first step towards that is going to config.yml and setting bot.redis.use_fakeredis to false.
Starting Redis in Docker (Recommended)
If you're using the Docker image provided in the project's Docker Compose, open your config.yml file. If you're running the bot in Docker, set bot.redis.host to redis, and if you're running it on the host set it to localhost. Set bot.redis.password to null.
Starting Redis Using Other Methods
You can run your own instance of Redis, but in that case you will need to correctly set bot.redis.host and bot.redis.port, and the bot.redis.password value in config-default.yml should not be overridden. Then, enter the .env file, and set REDIS_PASSWORD to whatever password you set.
Optional: Working with Metricity
Metricity is our home-grown bot for collecting metrics on activity within the server, such as what users are present, and IDs of the messages they've sent. Certain features in the Python bot rely on querying the Metricity database for information such as the number of messages a user has sent, most notably the voice verification system.
If you wish to work on a feature that relies on Metricity, for your convenience we've made the process of using it relatively painless with Docker: Enter the .env file you've written for the Python bot, and append the line USE_METRICITY=true.
Note that if you don't need Metricity, there's no reason to have it enabled as it is just unnecessary overhead.
To make the Metricity bot work with your test server, you will need to override its configurations similarly to the Python bot.
You can see the various configurations in the Metricity repo, but the bare minimum is the guild ID setting.
In your local version of the Python bot repo, create a file called metricity-config.toml and insert the following lines:
[bot]
guild_id = replace_with_your_guild_id
To properly replicate production behavior, set the staff_role_id, staff_categories, and ignore_categories fields as well.
Now, docker-compose up will also start Metricity.
If you want to run the bot locally, you can run docker-compose up metricity instead.
Issues?
If you have any issues with setting up the bot, come discuss it with us on the #dev-contrib channel on our server.
If you find any bugs in the bot or would like to request a feature, feel free to open an issue on the repository.
Appendix: Full ENV File Options
The following is a list of all available environment variables used by the bot:
| Variable | Required | Description |
|---|---|---|
BOT_TOKEN |
Always | Your Discord bot account's token (see Set Up a Bot Account). |
BOT_API_KEY |
When running bot without Docker | Used to authenticate with the site's API. When using Docker to run the bot, this is automatically set. By default, the site will always have the API key shown in the example below. |
BOT_SENTRY_DSN |
When connecting the bot to sentry | The DSN of the sentry monitor. |
BOT_TRACE_LOGGERS |
When you wish to see specific or all trace logs | Comma separated list that specifies which loggers emit trace logs through the listed names. If the ! prefix is used, all of the loggers except the listed ones are set to the trace level. If * is used, the root logger is set to the trace level. |
BOT_DEBUG |
In production | true or false, depending on whether to enable debug mode, affecting the behavior of certain features. true by default. |
REDIS_PASSWORD |
When not using FakeRedis | The password to connect to the Redis database (see Optional: Working with Redis). |
USE_METRICITY |
When using Metricity | true or false, depending on whether to enable metrics collection using Metricity (see Optional: Working with Metricity). false by default. |
GITHUB_API_KEY |
When you wish to interact with GitHub | The API key to interact with GitHub, for example to download files for the branding manager. |
METABASE_USERNAME |
When you wish to interact with Metabase | The username for a Metabase admin account. |
METABASE_PASSWORD |
When you wish to interact with Metabase | The password for a Metabase admin account. |
Have fun!